Tip #1: COLOR
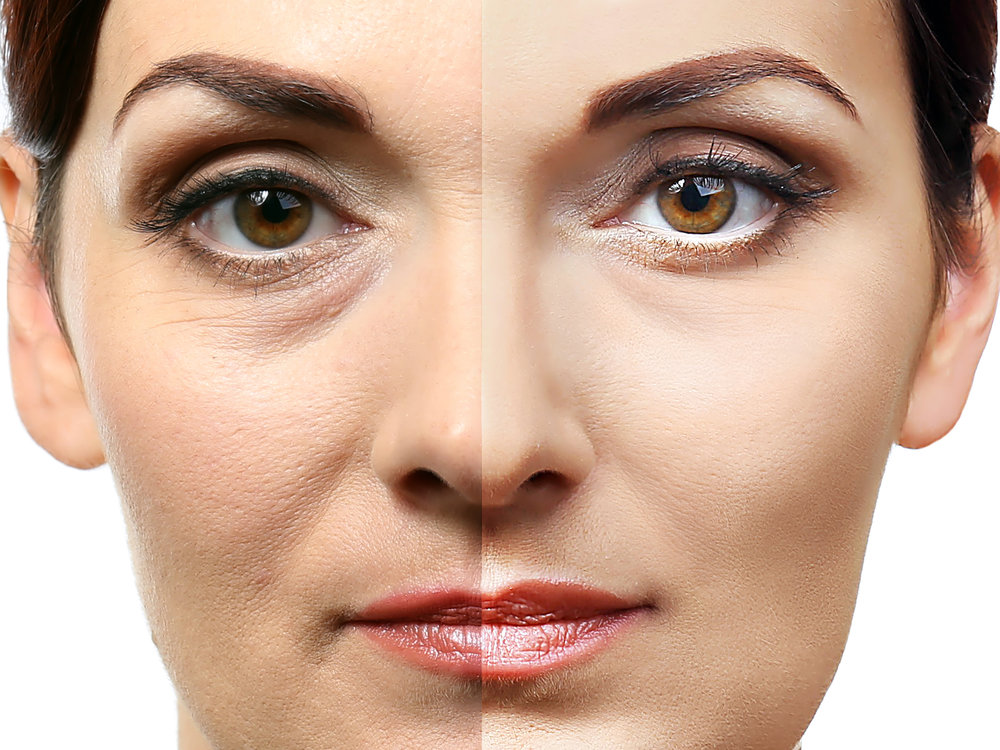
Colors can make skin look fresh and bright, dark and dusky, red and angry, or green and sickly. Small changes in “HUE” can suggest well-being or age, depending on which way you skew it. Always look to see that something pink or green that was not supposed to change looks the same on the other side. Take a look at the picture below for example. The eyes are different colors, but they are not supposed to be. In this case, the color difference is more of a light and dark issue than a red/green issue, but the difference in color is a great tip off that the picture is a little skewed.
Tip #2: LIGHTING
By far, the most influential aspect of a photograph is the lighting. Bright lights wash out details like fine lines and wrinkles. Brightening a photo with the computer can decrease contrast, or make the colors blend more together, and therefore look more even. Always look at the lighting on the before and the after. If they are not the same, chances are things are misrepresented. In the picture here, the eyes are different colors because the lighting is darker on the left. Darker lighting means deeper folds, more prominent wrinkles, etc… Always look for bright spots and dark spots, and any glare that just washes out the problems. This will be your first clue.
Tip #3: SATURATION
Saturation is the intensity of color in a picture. Basically, it describes how much paint is on the canvas. High saturation can make things look rounder or fuller, more plump. Lower saturation can make things look drab and less vibrant. See here the lips- much plumper on the right. Higher saturation is like putting an extra coat of lipstick on, without even touching the subject.
Tip #4: ANGLE
Do this experiment on yourself: hold your camera up high and take a picture of yourself facing up at it. Now take the same selfie with the camera in your lap and facing down. Totally different right? Not only does the angle change how the light bounces off things, but gravity also either pulls your face back to freshen you up, or forward to make things sag. The angle in which you take the picture can really make things look different. Always consider how the person is standing or holding their head. It can be a game-changer.
Tip #5: CLOSENESS
Because of the way that photo lenses work, there is an optimal distance at which to stand when taking a picture. Any more or less will change the photo itself, in a way in which zooming in or out will not fix. Without getting too technical, it’s all about the geometry of the light, or the way it bounces off your object and onto the lens. If you take a picture of someone’s breasts while standing close to them, they will look huge. Stand back six feet, and they will shrink up, without anyone doing anything to them at all. The close photo gives things a “fishbowl” appearance, almost like a panoramic view. Standing back lets the different elements in the photo even out and equilibrate. When considering that photo, try to see if any particular element seems a little blown up, or out of proportion. It may be exaggerated.
Tip #6: FACIAL EXPRESSION
Back in the day (I will date myself here), before and afters routinely showed the before with someone frowning or serious, and the after shot had a glowing smile. Infomercials are still famous for this, as you watch the before eggs sticking to the pan that no one will ever be able to clean, and the perfect after eggs slide onto a plate with three strawberries and a single sprig of mint. The intention is to suggest that everything was miserable before the treatment, and now we are all just giddy with contentment.
What has happened lately, interestingly enough, is that this has shifted a bit. Because there is such a huge focus on rejuvenation, and therefore wrinkle-reduction, after shots rarely show anyone smiling. Why not? Aren’t they just delirious after their Botox treatment? Well, the answer is that those happy-lines are in fact wrinkles. Showing someone smiling will remove much of the evidence that they had their faces appropriately treated. Smiling can not only bring out your laugh-lines and crow’s feet, it can also reveal your double chin and the bags under your eyes that normally only show in the morning before your coffee. Always take into consideration how the movement of facial muscles may affect how the skin folds around them.
Tip #7: POSTURE
For body shots, posture is everything. Stand in front of a mirror, then turn sideways. slump down your shoulders and hang your neck. Now curl your pelvis under. Ugh. Very “before”.
Now stand up straight, bring your shoulders back, and stick out your butt. Now tighten your abs. That’s better! Now twist at the waist- WOW!
Right there, you just created your own before and after with no surgery at all. Shoulder posture totally changes the way the breasts lay, and overall core positioning can push out your gut or pull it right in. How your legs are placed also has an effect. Stand forward with your shoulders and hips square. Meh. Now rotate just a little to the side and cross your feet in front of you. Very slimming! These are the tricks the stars use for their red carpet looks. These are also perfect before-and-after tips for why one look might look very different from the other.
Tip #8: CLOTHING
We all know that the clothes we wear can really change how we look. But they can also change what we think we see. The height of a collar can make a neck seem shorter and more chunky, or taller and slimmer. Low-waisted clothing reveals more of the belly, and it shows the definition of the midline. A higher waist will smudge out that line break between the narrowest part of the waist and the wider hips, and this could obscure the contour. When the before shows a high waist or chunky belt and the after has a streamlined (and sometimes Spanx-ed) profile, this may be part artifact and not all fact.
Tip #9: MAKEUP
Makeup is a very common tool for before and afters. In general, people look better in makeup. You can make or erase shadows, plump lips, brighten eyes, and take away shine. In this photo, the makeup colors look similar but the makeup is used very differently. The eye-shadow on the right brings out the eye and makes it look much bigger. The lipstick on that side goes beyond the lip line, and the color is brighter. This makes the lip much fuller. Shadows on the nose also make it look thinner and make the nostril look smaller. No, really, look closely. They fooled you!!
Tip #10: TONE
Finally, let’s talk tone. Ever notice how sometimes you read an email, and even though you can’t hear the person’s voice, you can feel their tone? Tone is a huge factor in photography. Think of it as the background music of the shot. In this photo, the left side seems sadder than the right, although at first glance the woman appears to be in the same mood. But if you really look at it, you will see that on the right side she is almost, sort of, subtly, smiling. The corner of her mouth is just a little up, the corner of her eye a little lifted, and the muscles in her face just a tad bit animated. She is a little happy. Not enough to tip you off, but just enough to make you feel it. The woman on the left had a bad day. The one on the right is feeling just fine. Almost happy. Definitely confident.
So how do you tell the tone of a photo? Easy. How does it make you feel? That’s your answer.
The verdict: Photos can show us things that are and things we want to show equally. When considering your cosmetic options, be an educated consumer. Surgery on your body is higher stakes than buying that almost-handbag, and the advertisements are more aggressive. Remember that the before and after shots you see are the best that person has to offer, and also represent what they imagine is a great result. Make sure your goals line up with theirs. But more importantly, when looking at those pictures, all designed to make you say “wow,” know how to spot these tricks. An excellent surgeon will doctor her patients, not her photographs.